Showing posts with label paper punches. Show all posts

Friday, 23 March 2012

A sunny day

Today is a beautiful sunny day. We did have a sunny day yesterday, but I spent much of it scrubbing and cleaning for a couple who were coming to view our home. They liked it but still have their own property to sell, so there will be no moving house for us as yet.

So what creative stuff has gone on around here lately? Well nothing too much as my parents were visiting for a few days. They only left yesterday morning.
But I could show you this giant cupcake that Naomi made last week...
It was made using one of those silicone moulds that come in three parts.
You can buy a similar one here.
It was delicious! Naomi...stop making cakes...we keep having to eat them!

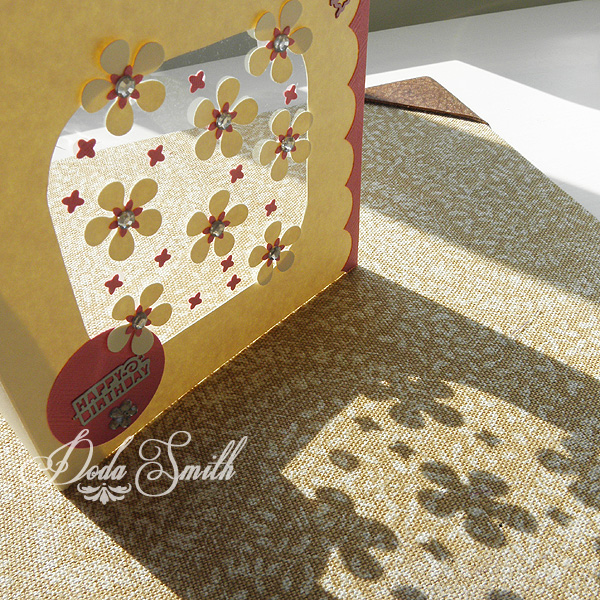
And I did make this card last week (with my Tonic Studios products of course). I like how it makes pretty shadows.
Hopefully I'll be able to crack on with a few more projects next week.
I hope the sun is shining where you are.

Friday, 9 March 2012

Easel Card Template

As I said in my last post, I've been trying out some new card shapes, just to have a change. I made this easel card using the following dimensions. (Click to enlarge the image if you are having trouble viewing it.)
I used my Tonic Studios Super trimmer for cutting and scoring the card, and I used my shape mates for the circle. The circle shape mate I used is actually slightly over the 12cm, but it still works fine with the card. In fact, it works better than exactly 12cm if I come to think about it.
Then you glue the circle to the card and trim the excess. Then you decorate as you desire.
I used a little button for this card to keep the card propped up. You can use a cut out shape on sticky pads if you prefer.
I stuck punched flowers behind the greeting to frame it with a colourful border.The other punch used in this card is the Multi Detail Butterfly.

For a completely different look, I went a bit monochrome.
With this card I used a petal pairs punch around the edge for a pretty border.

The difference with this card is that I added an extra fold which foreshortens the base of the card and provided a little ledge to stick the dotty border onto.
The image is from the Graphics Fairy.

So with one template,I have created two different looks.
I hope you have fun if you try this.

Wednesday, 7 March 2012

A Quick Card Post


Here's a little card I made the other day. I've been experimenting with different card shapes. I can't for the life of me remember what you call this shape.
The punches are of course by Tonic Studios.
I think you could say I got a little "punch drunk" with this one!

Monday, 27 February 2012

a little hello card

 
Hello! I wanted to show you this little card which has one of my polymer clay buttons made using a flower paper punch.
The large flower on the card is a combination of punches. The multi detail flower punch to which I have added a heart to the back of each petal , and on top the same flower punch as used on the button.
The little Hello detail is also made from polymer clay stamped with some alphabet rubber stamps.

Thursday, 2 February 2012

A recycling challenge...

Does the cost of fancy papers put you off cardmaking? Never fear. If you have a few paper punches in your arsenal, it is possible to produce cards relatively cheaply. Here I have issued myself a challenge. Decorate a card using packaging material.
I received this sweet little body wash set for my birthday in January. I have started using it, but instead of putting the card packaging in my recycle bin, I am going to use it to decorate a greetings card.
I'm not going to allow myself anything else for embellishing the card.

A few dabs of  Craft Tacky Glue later...

OK, so it won't win any design awards, but I knocked this up pretty quick. I even had enough of the packaging left over for another card.
It was relatively thin card, but it did punch really easily with the Tonic Studios Simplicity Geared punches. Now I have a couple of cheap and cheerful cards to add to the collection !

Do you think I should send the thankyou card to the person who gave me the shower gel to see if they notice what it was made from?

Tonic Studio Tools used...
Simplicity geared punch classics
Petal pairs box set 2 and Petal Pairs petite 1
Craft Tacky Glue
Shape mates

Over at Blog Tonic I have the same post but have also included a little challenge to YOU to make a recycled packaging card. Come on over and join us.

Monday, 30 January 2012

A Thankyou card


It's always good to keep a handy stash of thankyou cards  so I added this card to my box today. 
The flower is made with a pearl topped pin, a couple of tiny flower punchouts and three of the bigger flower. I glued the top part of the flower to the card to hold it in place but the rest is free to be fluffed up. 


I'd just like to point out - the pointy part of the pin is well ensconced within the top layer so hopefully my recipient's finger won't be pricked. We wouldn't want them falling asleep for 100 years now would we !


Tonic Studios Punches used.
Simplicity geared pattern punch -  Daisy Border
Simplicity geared classics - flower head
Ribbon Punch - 1cm

Tuesday, 24 January 2012

It's all in the presentation

If you've followed my blog for a while, you may know that I absolutely love making boxes. When I go to the trouble of making  handmade gift, I like to go the extra mile and make a handmade box to present it in. I had great fun decorating these boxes with a simple ribbon and flower embellishment. 

To stick on the ribbon , I used some double sided sticky tape.  I stick this to the box once I have cut and scored the template, but before sticking the box together. If you would like to make a similar sized box you could use my Playing Card Box template. I love to use Tonic Studios Super Trimmer to cut and score my box templates. It makes the job so quick and easy. I cut out all the outer edges with the trimmer and then cut the fiddly bits with my favourite scissors. The scoring is so easy to do with the Super trimmer, and it makes such a neat job. I used to do it with a ruler and a scoring tool, (and if that's all you have it will still work fine), but I would recommend the Super Trimmer to you. It goes so much quicker. I use it so much I'll be needing replacement blades very soon!
For the flower I punched out 5  flower shapes out of thin card, and then curled the edges of the petals inwards.  I then layered the flowers with a small dot of glue in the centre of each one. I pressed each flower in place until the glue dried using the eraser end of a pencil. I then finished off the flower with a jewel in the centre and glued it in place on the box. The finished flower is pretty sturdy. Because it is made of card and the layers are offset, it holds up well and can't be squashed easily. And doesn't it look pretty !

P.S. If you would like the opportunity to win a paper punch. Don't forget to enter Tonic Studios Giveaway which runs until February the 14th.

Wednesday, 19 October 2011

Paper punches - they're not just for cardmakers

I recently received a few new gorgeous Tonic Studios border and edger punches to try out. I must say, this Daisy border punch is now one of my favourite punches. It's so versatile. I made this card to send to friends who just got married. I made quite a fancy card- different to my usual clean and simple style.
I used several layers of vellum and shiny gold paper to create the layered effect. The rosette was made from vellum and because I object to sending things through the post in special sized boxes ('cos of the price), I flattened the concertina flower down in a spiral fashion so that it would fit into a regular envelope. I also made great use of the teeny little flowers that are punched out of the border- you might be able to spot some of them in some of my tiny journal creations too. They are so delicate and sweet. I also used the flower head punch and the punched out shapes from the multi detail heart (punched out of tomato paste tube - yet again!!!) 


Oh, I must also give you a quick tip for sticking down lace onto a card. First I use a scrap of paper and spread PVA glue in a strip the same size as the lace. Then I stick the lace onto the glue and lift it up again and it picks up the glue it needs. Then I stick it onto my card. That way you don't get bits of glue everywhere.


OK, paper punches are wonderful for cardmakers, but there is so much more you can do...
...what about making a delicate tea light holder.
It makes really pretty shadows and is a lovely winter décor idea and could also be used for dressing up a wedding table. You could personalise these with any text you wanted. So soft and delicate. 

I used my edger punch on some vellum and using a strip of double sided tape I stuck it around a straight sided glass jar. I wrote peace on a strip of vellum cut to size and put through my Dymo embossing labeller. I also stuck on the punched out Daisies and I think it looks really lacy. 


Another idea for using your border punch is to make some decorative shelf edging.
I used some pages from my vintage encyclopaedias. I cut strips from a few pages and got rid of all the white edges. Then I joined the strips side by side with some double sided tape and got busy with my edger punch.These punches must be the easiest border punches I have ever used! Virtually effortless!
 I think it looks really effective, don't you? I love the vintage look!


And I have one more idea for using a border  punch and this idea comes from my 5 year old little girl. The punch used here is the stars border from Tonic Studios.


They're purrrrrrfect for making tiny crowns for itty bitty kittys!!!
...So like I said...not just for cardmakers!!!

Friday, 2 September 2011

from boxes to notebooks!


I've moved on from the boxes now. I've been making these cute little matchbook notelets. 
I'll let you know how I made them soon. They're really fun and would make a nice little gift to pop in an envelope with a card. Or in a goody bag at partys. I'm on the lookout for miniature pencils now. Anyone know where I can find a supplier in the UK?

Wednesday, 17 August 2011

Time for a Giveaway

Hi !
Some of you might remember that I designed this little birdy paper punch for Tonic Studios.


Well good news...I now have a couple of these to give away. The punch is one of their Simplicity Geared Punches which makes using it a breeze. 
Hardly any effort is required to punch through paper or card. 


Would you like to get your paws on one?


I have two to giveaway. 
This giveaway is open to everyone.


Here's what you need to do...


1.Leave me a comment telling me how you would use your Birdy Punch for one entry...


2.Become a follower and leave me a comment to let me know for a second entry.


3.For a third entry you could post about it on your facebook or twitter or blog...leave me a comment letting me know where.


Please make sure I have some way of contacting you if you win!


The time of the draw is noon on 1st September 2011


Drawing is closed now...winners have been announced :-)


Monday, 20 December 2010

Hearts and Flowers part 1. - decorate a mug - easy peasy tutorial.

Here's a very simple little project to make a last minute gift for a teacher or auntie. It's lovely for your child to be able to give something which they have made themselves. Fill it with a cellophane bag of choccies tied up with pretty ribbon, and Bob's your Uncle!

Most crafters will probably have a heart and a flower paper punch in their stash. They are very versatile items to own. I'm using Tonic Studio's paper punches for this project. If you don't have any paper punches, then may I suggest that these ones would be good basic punches for you to start off your collection. (And believe me, once you've started your collection - you'll be buying more!!! )
You will need... a willing little helper. This is my sweet and creative 4 year old daughter .


A heart and a flower paper punch...

...and a bunch of other stuff. I have here some Pebeo Porcelaine paint, a sheet of acetate for making a stencil (although you could just as easily use paper for this), an old sponge cut into little blocks for painting, some milk bottle lids for the paint, some masking tape and most importantly, a plain white mug for decorating. I find Tesco's basics range brilliant for this. A straight sided mug is easiest to work with.
{Slight intermission where my daughter discovers building with the foam blocks is fun...I always save any foam from packaging...I think this foam might have come with a laptop computer. }

To start with, I cut a strip of acetate the right size to go around the mug, then after a little help positioning the shapes, my little girl punched them out. OK this was posed, she did need to press with both hands to activate the punch, but she did manage to punch out the shapes all by herself. We alternated heart/ flower/ heart/ flower etc. Now we all know paper punches are wonderful for using with paper to make cards and other paper items, but did you know that using them to create a stencil can be very effective too.
We fastened the punched strip to the mug with masking tape and then my little girl chose some paint. She mixed the colours herself using a cotton bud in the plastic lids.
Using the little pieces of sponge, she dab, dab, dabbed. Then mixed a couple more colours and did the same. We then moved the stencil to the bottom of the mug and repeated the process. Simple!
If you need to tidy up any areas simply moisten a cotton bud with water and clean up the edges a little.

Look what I did mum!
Now, you need to follow your paint's manufacturers instructions for curing and baking in the oven to fix the paint, then it's ready to give.

Of course you don't have to use hearts and flowers, if you have other punches that you would prefer, then go ahead - have fun! Let me know if you try this - I'd love to see the results.

I have another hearts and flowers tutorial coming up in the new year, so keep a look out for it!