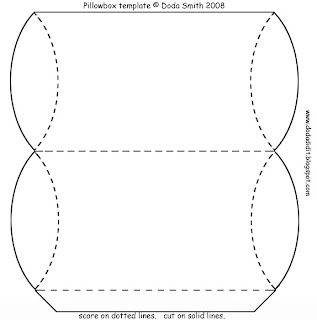
I wanted to share one of my box patterns with you.
So here in a few easy steps is my pillow box tutorial.
Firstly, click on the template image for the larger size
and save to your PC. Now import it into your favourite
desktop publishing software.
I use Microsoft Publisher, even though I have Quark,
because I find it very intuitive to use.

I manage to fit two box templates on one A4 bit of paper.
To do this, I have the images sized at 90%.
I'm not sure if you can fit two on letter size,
but I would think you probably can.
(If you are going to resize the images,
make sure you do it equally horizontally and vertically.)

OK, so now you print your images on the wrong side
of a nice bit of patterned card. Card that is about the
right thickness for a greetings card works fine.

Now you cut along the solid lines, and score along
the dotted lines like so. Pre fold along the scores.

I like to use a circle punch to take out a semi circle each side
to make it easier to open the box when it is finished.
You'll see here where I have made the holes.
Actually if you make them on the panel where the flap isn't,
then it works better. Not like what I did here!
(I was too lazy to retake the photos)

Now place some glue on the flap and hold
together or use clothes pegs until the glue is dry.

Now push in the ends of your box, and voila!
A little pillow box for you. Now get creative, you can glue and stick
and decorate your little gift box to make it extra special.

If you make some, then I'd love to see!
Please send me a link.
Have fun.
Please feel free to use this pillow box
for your gift giving.
You may also use this to package items that you sell,
but please do not sell the pattern.
Need a different style gift box?
Why not have a look at my Free template for a
Playing Card Box

 ...and a tiny little mousey playset,
 ...and a tiny little mousey playset,

 I manage to fit two box templates on one A4 bit of paper.
  OK, so now you print your images on the wrong side
 Now you cut along the solid lines, and score along

 Now push in the ends of your box, and voila!
 If you make some, then I'd love to see!
 (I upcycled a bit of leather from a broken