
I wanted to share one of my box patterns with you.
So here in a few easy steps is my pillow box tutorial.
So here in a few easy steps is my pillow box tutorial.
Firstly, click on the template image for the larger size
and save to your PC. Now import it into your favourite
desktop publishing software.
I use Microsoft Publisher, even though I have Quark,
because I find it very intuitive to use.
I use Microsoft Publisher, even though I have Quark,
because I find it very intuitive to use.
 I manage to fit two box templates on one A4 bit of paper.
To do this, I have the images sized at 90%.
I'm not sure if you can fit two on letter size,
but I would think you probably can.
(If you are going to resize the images,
make sure you do it equally horizontally and vertically.)
 OK, so now you print your images on the wrong side
of a nice bit of patterned card. Card that is about the
right thickness for a greetings card works fine.
 Now you cut along the solid lines, and score along
the dotted lines like so. Pre fold along the scores.
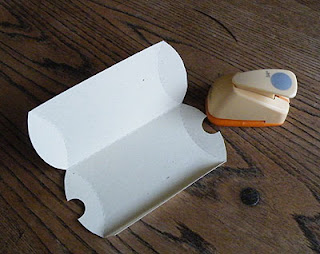
I like to use a circle punch to take out a semi circle each side
to make it easier to open the box when it is finished.
You'll see here where I have made the holes.
Actually if you make them on the panel where the flap isn't,
then it works better. Not like what I did here!
(I was too lazy to retake the photos)
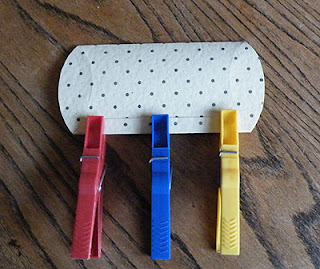
Now place some glue on the flap and hold
together or use clothes pegs until the glue is dry.
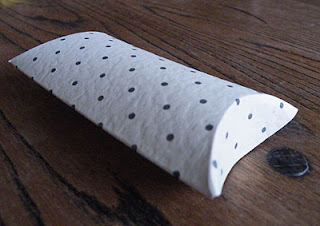
 Now push in the ends of your box, and voila!
A little pillow box for you. Now get creative, you can glue and stick
and decorate your little gift box to make it extra special.
 If you make some, then I'd love to see!
Please send me a link.
Have fun.
Please feel free to use this pillow box
for your gift giving.
You may also use this to package items that you sell,
but please do not sell the pattern.
Need a different style gift box?
Why not have a look at my Free template for a Playing Card Box

I like to use a circle punch to take out a semi circle each side
to make it easier to open the box when it is finished.
You'll see here where I have made the holes.
Actually if you make them on the panel where the flap isn't,
then it works better. Not like what I did here!
(I was too lazy to retake the photos)

Now place some glue on the flap and hold
together or use clothes pegs until the glue is dry.
 Now push in the ends of your box, and voila!
A little pillow box for you. Now get creative, you can glue and stick
and decorate your little gift box to make it extra special.
 If you make some, then I'd love to see!
Please send me a link.
Have fun.
Please feel free to use this pillow box
for your gift giving.
You may also use this to package items that you sell,
but please do not sell the pattern.
Need a different style gift box?
Why not have a look at my Free template for a Playing Card Box
Cool! Thank you for sharing. I might try soon.
ReplyDeletethis is fantastic! what a great tutorial. :)
ReplyDeleteThanks so much for stopping by and leaving such a comforting message. I really appreciate you taking time do so. I love your tutorial on the pillow box. It's wonderful. I will try my hand at it soon. Thanks for sharing your wisdom.
ReplyDeleteThanks for the pillow box template... it inspired me to adjust them so they would fit two to a page. Then, I turned them into a snowman (with a piece of candy tucked inside) ornament to hang! Appreciated your sharing! ^o^ CM2
ReplyDeletehttp://messageboard.pccrafter.com/tm.aspx?m=530158
Thank you! I am going to see if I can adapt this box to fit my earrings. My customers might just love them.
ReplyDeleteI have put pictures of my version of your box on my blog. I think they are going to work perfectly!
ReplyDeletevery gud box ! i really like this thanks. beckie x
ReplyDeletethanks for the tutorial, have a show coming up this Sat and Sun would make great gift boxes for my earrings, bracelets and necklaces!
ReplyDeleteP.S.
ReplyDeletetry glueing the little flap onto the inside of the box, it will just look like a seam there.
Thanks for the great tip Debbie.
ReplyDeleteThis is exactly what I was looking for. Thanks for sharing!
ReplyDeleteGlad you liked it Tricia!
ReplyDeleteThanks.
thanks I was looking for info just like this : ))
ReplyDeleteHappy New Year
Thanks very much for the template and step-by-step! I'm making thess up for my wedding favors and they'll look lovely!
ReplyDeleteAnyone without Publisher, you can just use Microsoft Word and adjust as needed.
So easy! thanks again!!
Hallo,
ReplyDeleteWhat a beautiful blog you have! thanks for sharing this tutorial about making gift boxes, I am going to try one - if I succeed I will send you a photo :-)
Anna
Thank you so much for sharing your pillow box template and instructions. I've included your link in my blog - http://www.bijoubooth.blogspot.com.
ReplyDeleteCheck it out and see my examples.
Thanks again!
My goodness! Thank you SO much for this tutorial and for the pillowbox template! I've been wanting to make a pillowbox for SO, so long. I've tried before and it always turned out a failure...I guess I didn't use the right paper either. But anyway.
ReplyDeleteYour tutorial was great and for the first time I made a cute little pillowbox!
Great, this tutorial is just what I was looking for! Thank you!
ReplyDeleteBrilliant - Just what I xas looking for - Thank you so much!
ReplyDeleteGreat idea and thanks for the template! I used this to make card holders for Mother's Day for all our mothers at church!
ReplyDeleteThank you very much for sharing
ReplyDeleteThanks for this! I pinned you :)
ReplyDeleteThank you for this and I have browsed all of your lovely Blog.
ReplyDeleteWould love to know more about the pic on your 'about me' section, love that.
Mo
Hi Mo, thanks for asking it was a watercolour I did a long time ago...you can see it in this post http://dodadidit.blogspot.co.uk/2009/02/lovebirds.html
Delete