This time the NEW thing was samphire. A salty plant that grows on the seashore. I made a barley stew with red onions home-grown courgettes and cashew nuts and it was served with samphire and mozzarella. Let's just say it filled a hole, but I won't be buying it again in a hurry. It was all a bit weird. That salty crunch ....I don't think the texture of barley really helped with the whole experience. I'm sure Hugh Fearnley-Whittingstall's samphire creations taste delicious but I have to say, so far, I am not a fan.
Monday, 27 August 2012
Samphire....it's salty!
Every once in a while I get the urge to poison my family try out something new.
This time the NEW thing was samphire. A salty plant that grows on the seashore. I made a barley stew with red onions home-grown courgettes and cashew nuts and it was served with samphire and mozzarella. Let's just say it filled a hole, but I won't be buying it again in a hurry. It was all a bit weird. That salty crunch ....I don't think the texture of barley really helped with the whole experience. I'm sure Hugh Fearnley-Whittingstall's samphire creations taste delicious but I have to say, so far, I am not a fan.
Thursday, 16 August 2012
My little munchkin
Here's my little flower just before heading off to school. She has a very wobbly tooth right now, I think it will be coming out very soon! I guess this will be her "gap year!"
Wednesday, 15 August 2012
Routine has returned
Hello! Things are getting back to routine around here.
My little girl went back to school yesterday, ( Scotland goes back earlier than England), so I have finally managed a little card-making time. Just the Tonic!
I have been wanting to get my watercolours out for a long, long while now and get back to painting, so I thought the perfect introduction to using my brush again would be to colour some of Tonic Studio's lovely pick of the bunch stamps. It felt so good to be using my paints again - very therapeutic.
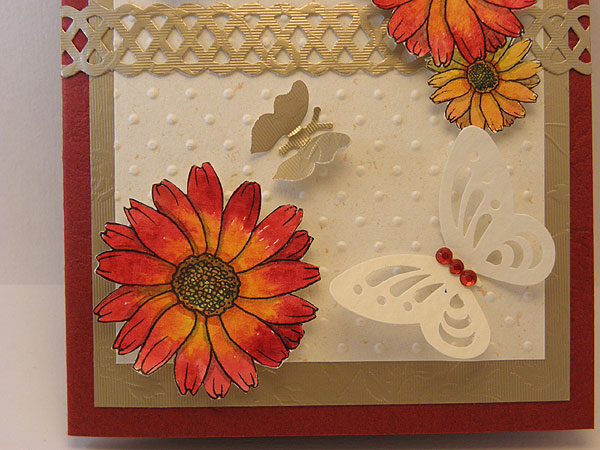
This is the first card I have done for a while. I have used some flowers from the Chrysanthemum set. Then I have cut them out with decoupage scissors and raised them on the card using foam squares from Scrapbook adhesives by 3L.
If you haven't tried watercolour, you should give it a go. Just don't skimp on getting a decent brush. If you are unsure about drawing your own images, using stamps is a great way to get a feel for painting.
Tuesday, 7 August 2012
Finally made something
It is hand drawn on a scrap of vintage linen and then bonded to two layers of felt. The body is copper wire and seed beads.
Labels:
brooch,
butterfly,
felt,
handmade,
my artwork
Monday, 6 August 2012
Still busy...
![]() |
| a picture of one of my neighbours |
Hello, and thanks for visiting today. Life is still pretty busy here and I am aware I haven't blogged much lately. Hopefully when the school holidays are over I will get back to routine. My fingers are eager to get some crafting and artwork done but every time I plan to get busy, something else comes up. Never mind, it is good to have my husband, son and little girl home for the holidays. My little girl is actually missing school, but then she is only 6.
Hope that you are having some decent weather where you are. Have a wonderful day.
Monday, 23 July 2012
Stamp Storage Idea
I have quite a few rubber stamps and clear stamps, and I must confess, they are all in a drawer in a great big muddle. When I received my beautiful new Tonic Studios stamps designed by Ruth Hamilton, I knew they deserved a better storage solution to keep them organised and in tip top condition. Here is my solution...
What you will need...
An A4 Ring binder - I got mine at Tesco for about 57p !
Some poly pockets - get good quality ones as it will make cutting them to size much easier.
Double sided sticky tape
PVA Glue
Fabric for the cover.
Inkpad suitable for using on Fabric.
Quality Coloured pencils or acrylic paints.
Paper or card for covering the inside
Optional - elastic, hole punch, eyelets and eyelet setting tool.
Measure the size of the stamp sheet and allow extra for when the folder is closed.
For this Tonic Studios range a good size for the side of the cover (not including the spine) is 14.5cm by 23.5cm.
Cut out with a craft knife and metal ruler. Don't forget to protect your work surface with a cutting mat.
My folder was bright blue and I was a bit worried it would shine through the fabric, so I covered it with a white printer paper first. I use PVA glue thinned down with a little water.
I used some curtain lining cotton fabric and cut a piece about an inch extra all round bigger than the folder. I used the lovely Fuschia and Lily stamps to stamp all over the fabric and then coloured in using my Karisma pencils - which are the same as Prismacolours. You could use watered down acrylic paints or fabric paints for this.
I then pasted glue all over the front of the folder and adhered my fabric. It is best to let it dry before moving on to the next stage. Here you see I am brushing the corners of the fabric with glue and then letting them dry. This is to prevent fraying when I snip the fabric off.
Snip off the corners but leave a few millimetres so there is enough to cover the corner of the folder neatly. Glue it all down and wait for it to dry.
Once it was dry I punched the back of the folder 1inch in from the corners and inserted some elastic which is then held in place with eyelets. This will be to hold the folder closed.
To cover all the raw edges on the inside, I stamped this gorgeous bee stamp from the Lily set ( I love bees) on some lilac card and stuck it down. Next time I do this, I might try and work around the ring mechanism in a different way.
The Poly pockets were cut to a centimetre wider than I needed so I could then snip 1cm of the width of the top layer, fold it over and stick it with double sided sticky tape. Now I can just slide out the stamps I need, use them, and pop them back in again easily.
I don't know why it never occurred to me to chop down an A4 Ring Binder before, but just imagine the possibilities. You can make a customised folder to suit your needs. Easy peasy - and cheap too.
Aren't these new stamps so pretty?
Hello!
Hi, I know it's been a while. Despite the fact it is the school holidays, life seems to have been busier than ever. What's been happening? Well... visitors, house viewings, birthdays, decorating, gardening, keeping a six year old entertained - I just don't know where the time goes, I really don't!
This is the birthday cake I made for my photographer daughter Naomi. I really must buy a cake smoother for the fondant!!!
I'll be back shortly with a project I've just made...
Subscribe to:
Posts (Atom)