Showing posts with label ideas for paper punches. Show all posts
Monday, 26 May 2014
Goodmorning
Hello there. I never got around to showing you all the other jewellery boxes I made the other week.
As usual, it's been pretty busy around here.
As you can see, I had a lot of fun making pretty jewellery with shrink plastic with this range of dies and punches.
You can find out more details on Blog Tonic.
I also made a plaque for a dear friend who is having a baby very soon.
Today, I am whizzing around - or I will be shortly, getting the place ready for my little 8 year old daughter's birthday party. How the time flies! I'd better get busy, there is much to do! BTW, she was very impressed with the pop up butterflies inside her birthday card!
Have a lovely day
Doda
xxxx
Wednesday, 16 May 2012
Finished my latest order...
Thursday, 10 May 2012
What I'm working on right now...
I'm currently working on some Order of Services for a friend. I decided to try out the hot foil printer that my Dad gave me. I used to help him print business cards with it many years ago so it was a bit of a fiddle to get it working and set up right.
I found this old photo of me and my Dad using the machine in 1985, (I remember that dodgy cardigan well)- I may have aged a bit since then (who am I kidding, of course I have!), now I have reason to avoid the camera, don't know why I always did that. I wish I'd paid more attention to my instructor when I was younger, but anyway, I think I've got it sussed now. More on that later on.
While the machine was heating up and cooling down and heating up again (so that I could test it and make fine adjustments without burning my fingers), I made this fiddly thankyou card.
I used some fine nylon beading thread and glued it with Craft Tacky Glue between two punched out butterflies. In order for this to stay in place while it was drying, I had the thread stretched straight and stuck to my glass cutting mat with tape.
Inside I used a couple of punched hearts to hold the thread in place. My thread was longer than the card, and while it was drying I again stuck the thread to the glass cutting mat on either side. I only trimmed it once it was dry.
Before the card was inserted in the envelope I gave the butterfly about 5 twists so that when the card is taken out and opened it spins around a little.
(The pretty punched designs are all from Tonic Studios.)
Tonic Tools used..
- Shape Mate circle
- Simplicity Geared punched classics flower head
- Simplicity geared pattern punches..Daisy Border 2, Floral Border 2, Victorian Border , and the tiny flowers are punchetti* from this Floral Border
- Multi Detail Butterfly punch
- Classic Heart medium punch
*punchetti is my word for the little bits that are punched out of the pattern punches.
Tuesday, 1 May 2012
The garden calls...
The sunny days have been a bit sparse, and there are so many things to get on with in the garden right now it has been a bit frustrating. I have some lovely Aquilegia William Guinness Double
and some Clary Sage seeds to plant so I really must get out in the fresh air and take advantage of the sunshine which has just appeared.
I'm hoping mine will end up looking like those pictures!
There's nothing quite like a spot of gardening. But before I head off to the garden, I have just made a quick card to send to a garden loving friend.
The lovely carrots image is from the Graphics Fairy, and I have coloured it in with my favourite Karisma pencils which are pretty much the same as Prismacolors.
I have used a couple of the new Tonic Studios border punches which will be in your stores before too long. I also used my Shape Mate for the circle, and my Multi Detail flower punch. A bit of raffia gives it that nice natural look.
OK, I'm out of here :-)
Tuesday, 17 April 2012
back to routine
It's been a fun and busy couple of weeks. The weather has fluctuated between delightfully warm and extremely cold.
One day we had a power cut all day- and that of course would be the day we had the snow. After an initial play in the snow, we all sat huddled by the log fire listening to crackly music on the wind up gramophone.
However, it is back to routine now. School is back today and I am enjoying the peace despite missing everyone, so I have just been at my desk making a card for a friend. Sometimes a simple design works best. I've used my Tonic Studios mini butterfly punch, and also their corner rounder for this card.
Friday, 16 March 2012
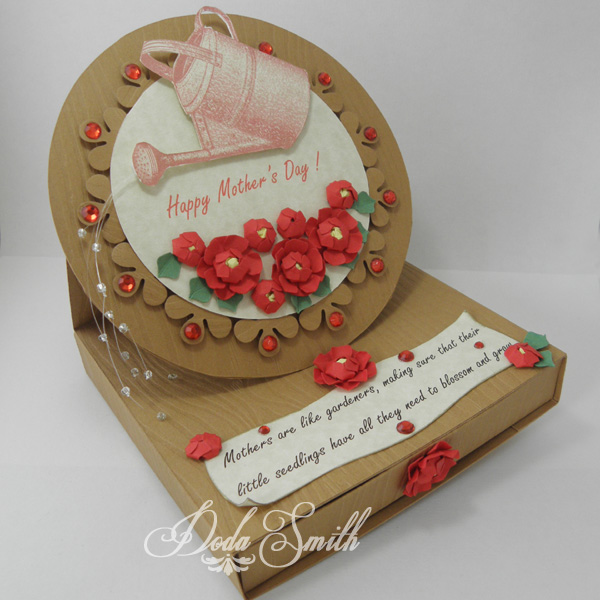
Easel card with extras
I added an extra bit to my easel card that I showed you how to make a couple of posts back. You can find it here.
Now you can make a card with a little drawer underneath to pop a little gift inside. If you would like the template for the box, you can download it here.
The "water from the can was made using beading thread and silver glass seed beads. It might have been better to have the water actually going on the flowers - maybe I'll do that if I use that effect another time. Paper punches by Tonic Studios, Image from the "graphics fairy" Quote by me.
Wednesday, 22 February 2012
Paper punches and polymer clay
Ever since I saw this wonderful technique using papercuts to emboss polymer clay, I knew I wanted to try this with my Tonic Studios paper punches.
I used a textured card and punched a variety of shapes to try out. The dark patches on the card are because this is after they have been used with the clay.
I really enjoyed the technique and made a few bits and pieces.
Cute little earrings with this butterfly paper punch.
While the card was still in place I used it like a stencil and rubbed on pearlex powders and glitter to get different effects.
These earrings are made with the branch part of the birdy punch.
I used a different texture of card for this one. Also with the birdy punch.
More birdy punch. This time with white pearlex powder on black clay. It makes the raised areas look silver leafed.
I used my flower punch for this one and added detail with my craft pick.
This one has glitter on the flower area and pearlex powders around it.
This time I added an organic looking centre to the flower by rolling tiny egg shapes and pressing them onto the clay with my craft pick.
I made a ring to match it. This one has circles on top of the egg shapes pressed with an empty ballpoint pen. It's supposed to look like flowers and leaves.
So If you like to play with polymer clay and you have some paper punches, then give this a try. It's great fun. I'll show you some of the buttons and card embellishments I've been making very soon.
I used a textured card and punched a variety of shapes to try out. The dark patches on the card are because this is after they have been used with the clay.
Cute little earrings with this butterfly paper punch.
While the card was still in place I used it like a stencil and rubbed on pearlex powders and glitter to get different effects.
These earrings are made with the branch part of the birdy punch.
I used a different texture of card for this one. Also with the birdy punch.
More birdy punch. This time with white pearlex powder on black clay. It makes the raised areas look silver leafed.
I used my flower punch for this one and added detail with my craft pick.
This one has glitter on the flower area and pearlex powders around it.
This time I added an organic looking centre to the flower by rolling tiny egg shapes and pressing them onto the clay with my craft pick.
I made a ring to match it. This one has circles on top of the egg shapes pressed with an empty ballpoint pen. It's supposed to look like flowers and leaves.
So If you like to play with polymer clay and you have some paper punches, then give this a try. It's great fun. I'll show you some of the buttons and card embellishments I've been making very soon.
Monday, 20 February 2012
Wedding Invitations
I still am not feeling 100% after my bout of flu, but at least my brain feels like it is accessible again, so I finally got around to finishing some wedding invitations for a friend. I made 120 of them!
To make the card I started with A4 sized pearly card and cut them into two. Then using my Super Trimmer with the scoring blade, I scored them all so that they are gatefold cards. I then used a bone folder to press all the creases nice and flat.
Here's a handy hint...if you have a lot of cards to score at the same size, then use a pencil to mark a guideline on your trimmer. It wipes off easily afterwards and saves a lot of time.
I found that the best glue for sticking on the hearts was my Funky Gluestick.
And the speediest method of sticking in the inserts was the Funky Tape Runner.
I found some nice quality envelopes on Ebay. I punched them to match the cards.
And of course, being the mad box making lady that I am, I had to make boxes to put them in too. So I made six boxes that hold 20 cards each.
Now I just have to hope that the Royal Mail gets the package to my friend safely.
The punches used were...
Crossing Heart Medium paper punch
Multi Detail Craft Punch - Heart
Simplicity Geared Punch - Rings
To make the card I started with A4 sized pearly card and cut them into two. Then using my Super Trimmer with the scoring blade, I scored them all so that they are gatefold cards. I then used a bone folder to press all the creases nice and flat.
I found that the best glue for sticking on the hearts was my Funky Gluestick.
And the speediest method of sticking in the inserts was the Funky Tape Runner.
I found some nice quality envelopes on Ebay. I punched them to match the cards.
Now I just have to hope that the Royal Mail gets the package to my friend safely.
The punches used were...
Crossing Heart Medium paper punch
Multi Detail Craft Punch - Heart
Simplicity Geared Punch - Rings
Thursday, 26 January 2012
An anniversary card
I was playing around with my Birdy Paper punch and used it to make this card for my parents. I'm ahead of schedule for once! I've been rather behind with everything lately!
I'm really loving the pink and grey scheme at the moment. I got a small reel of lovely cotton dusky pink ribbon. It wasn't wide enough to back the Birdies though. But never fear, I raided my stash of old roller blind samples from way back when my Dad used to sell them as a part-time extra job and I found a sample which was the perfect colour. Just goes to show you should hang onto your craft stash 'cos you never know when it might come in useful.
I'm loving all the texture too. Little details like this can make all the difference.
I stuck the insert to the inside front to keep it all looking neat.
Tonic Studios Punches used...
Simplicity geared punch - Birdy
Simplicity geared classics - Flower Head
Mini Punch - Traditional heart
Ribbon Punch - 1cm
I'm really loving the pink and grey scheme at the moment. I got a small reel of lovely cotton dusky pink ribbon. It wasn't wide enough to back the Birdies though. But never fear, I raided my stash of old roller blind samples from way back when my Dad used to sell them as a part-time extra job and I found a sample which was the perfect colour. Just goes to show you should hang onto your craft stash 'cos you never know when it might come in useful.
I'm loving all the texture too. Little details like this can make all the difference.
Tonic Studios Punches used...
Simplicity geared punch - Birdy
Simplicity geared classics - Flower Head
Mini Punch - Traditional heart
Ribbon Punch - 1cm
Tuesday, 24 January 2012
It's all in the presentation
If you've followed my blog for a while, you may know that I absolutely love making boxes. When I go to the trouble of making handmade gift, I like to go the extra mile and make a handmade box to present it in. I had great fun decorating these boxes with a simple ribbon and flower embellishment.
To stick on the ribbon , I used some double sided sticky tape. I stick this to the box once I have cut and scored the template, but before sticking the box together. If you would like to make a similar sized box you could use my Playing Card Box template. I love to use Tonic Studios Super Trimmer to cut and score my box templates. It makes the job so quick and easy. I cut out all the outer edges with the trimmer and then cut the fiddly bits with my favourite scissors. The scoring is so easy to do with the Super trimmer, and it makes such a neat job. I used to do it with a ruler and a scoring tool, (and if that's all you have it will still work fine), but I would recommend the Super Trimmer to you. It goes so much quicker. I use it so much I'll be needing replacement blades very soon!
For the flower I punched out 5 flower shapes out of thin card, and then curled the edges of the petals inwards. I then layered the flowers with a small dot of glue in the centre of each one. I pressed each flower in place until the glue dried using the eraser end of a pencil. I then finished off the flower with a jewel in the centre and glued it in place on the box. The finished flower is pretty sturdy. Because it is made of card and the layers are offset, it holds up well and can't be squashed easily. And doesn't it look pretty !
P.S. If you would like the opportunity to win a paper punch. Don't forget to enter Tonic Studios Giveaway which runs until February the 14th.
Subscribe to:
Posts (Atom)