Showing posts with label cardmaking. Show all posts

Friday, 27 September 2013

More cardmaking


I've been busy making quite a few cards lately. This one is in Oriental style. That backing paper for some reason put me in mind of this famous Japanese image - The Great Wave off Kanagawa. That's what inspired the card.


Handmade tassel if course !


I also have made a card inspired by autumn, using a famous quote from George Elliot.


There is another fancy card I have made recently too, but I can't show you that one as the recipient hasn't got it yet.

I'm not cardmaking this morning though...I'm off to make a big pot of vegetable soup to share with some friends.

Have a lovely day !

Doda
xxx


Wednesday, 8 May 2013

Birdy goings on

Just a flying visit to my blog today! I've been making some bird cards with the new Tonic Studios range of craft goodies. I'm also in the middle of making a cushion using one of their bird dies to cut out the felt. Here it is in progress. More to come on that in the future.
By the looks of the two projects above, it seems I am in a colourful mode at the moment. I hadn't realised!

Thursday, 10 May 2012

What I'm working on right now...


I'm currently working on some Order of Services for a friend. I decided to try out the hot foil printer that my Dad gave me. I used to help him print business cards with it many years ago so it was a bit of a fiddle to get it working and set up right.


I found this old photo of me and my Dad using the machine in 1985, (I remember that dodgy cardigan well)- I may have aged a bit since then (who am I kidding, of course I have!),  now I have reason to avoid the camera, don't know why I always did that. I wish I'd paid more attention to my instructor when I was younger, but anyway, I think I've got it sussed now. More on that later on.

While the machine was heating up and cooling down and heating up again (so that I could test it and make fine adjustments without burning my fingers), I made this fiddly thankyou card.


I used some fine nylon beading thread and glued it with Craft Tacky Glue between two punched out butterflies. In order for this to stay in place while it was drying, I had the thread stretched straight and stuck to my glass cutting mat with tape.


Inside I used a couple of punched hearts to hold the thread in place. My thread was longer than the card, and while it was drying I again stuck the thread to the glass cutting mat on either side. I only trimmed it once it was dry.


Before the card was inserted in the envelope I gave the butterfly about 5 twists so that when the card is taken out and opened it spins around a little.

(The pretty punched designs are all from Tonic Studios.)

Tonic Tools used..


*punchetti is my word for the little bits that are punched out of the pattern punches.

Friday, 20 April 2012

All occasions cards


I always like to keep a stack of cards ready in my stash and it is useful if you keep some that will be handy for any occasion. 


The way to quickly turn this into a birthday, anniversary, or a thank you card is to keep a ready supply of assorted printed inserts. 


I print up my inserts onto A4 paper and trim them to size and fold them ready for sticking into my cards. 


This all white card makes use of sticky pads to raise the layers and give a smart 3D effect. I love this pretty little butterfly punch from Tonic Studios


I also used my corner rounder for this card. I love the professional finish it gives to a card. 

P.S. Don't forget to enter my digital giveaway . Even if you're not a scrapbooking fan, I think you'll enjoy playing with this software to make all kinds of things.

Have a wonderful creative day!

Tuesday, 17 April 2012

back to routine


It's been a fun and busy couple of weeks. The weather has fluctuated between delightfully warm and extremely cold.

One day we had a power cut all day- and that of course would be the day we had the snow. After an initial play in the snow, we all sat huddled by the log fire listening to crackly music on the wind up gramophone.

Veggieburgers were cooked in a frying pan over the fire and we later toasted some pancakes using my granny's old brass toasting fork. By the end of the day we were a little stir crazy I can tell you!

However, it is back to routine now. School is back today and I am enjoying the peace despite missing everyone, so I have just been at my desk making a card for a friend. Sometimes a simple design works best. I've used my Tonic Studios mini butterfly punch, and also their corner rounder for this card.


Friday, 23 March 2012

A sunny day

Today is a beautiful sunny day. We did have a sunny day yesterday, but I spent much of it scrubbing and cleaning for a couple who were coming to view our home. They liked it but still have their own property to sell, so there will be no moving house for us as yet.

So what creative stuff has gone on around here lately? Well nothing too much as my parents were visiting for a few days. They only left yesterday morning.
But I could show you this giant cupcake that Naomi made last week...
It was made using one of those silicone moulds that come in three parts.
You can buy a similar one here.
It was delicious! Naomi...stop making cakes...we keep having to eat them!

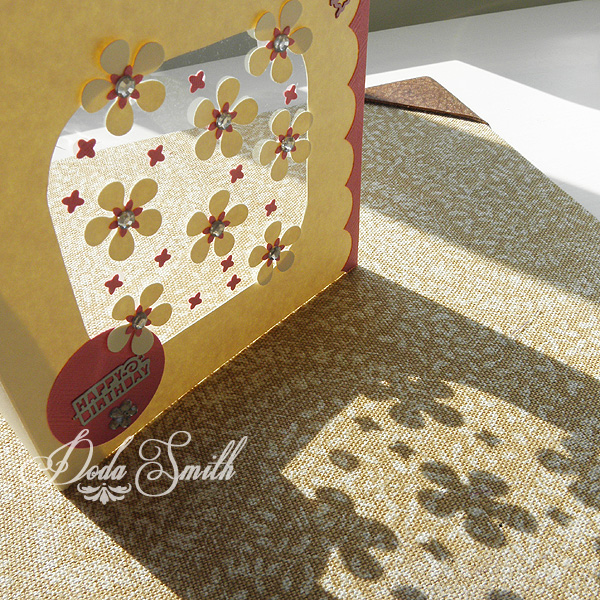
And I did make this card last week (with my Tonic Studios products of course). I like how it makes pretty shadows.
Hopefully I'll be able to crack on with a few more projects next week.
I hope the sun is shining where you are.

Wednesday, 19 October 2011

Paper punches - they're not just for cardmakers

I recently received a few new gorgeous Tonic Studios border and edger punches to try out. I must say, this Daisy border punch is now one of my favourite punches. It's so versatile. I made this card to send to friends who just got married. I made quite a fancy card- different to my usual clean and simple style.
I used several layers of vellum and shiny gold paper to create the layered effect. The rosette was made from vellum and because I object to sending things through the post in special sized boxes ('cos of the price), I flattened the concertina flower down in a spiral fashion so that it would fit into a regular envelope. I also made great use of the teeny little flowers that are punched out of the border- you might be able to spot some of them in some of my tiny journal creations too. They are so delicate and sweet. I also used the flower head punch and the punched out shapes from the multi detail heart (punched out of tomato paste tube - yet again!!!) 


Oh, I must also give you a quick tip for sticking down lace onto a card. First I use a scrap of paper and spread PVA glue in a strip the same size as the lace. Then I stick the lace onto the glue and lift it up again and it picks up the glue it needs. Then I stick it onto my card. That way you don't get bits of glue everywhere.


OK, paper punches are wonderful for cardmakers, but there is so much more you can do...
...what about making a delicate tea light holder.
It makes really pretty shadows and is a lovely winter décor idea and could also be used for dressing up a wedding table. You could personalise these with any text you wanted. So soft and delicate. 

I used my edger punch on some vellum and using a strip of double sided tape I stuck it around a straight sided glass jar. I wrote peace on a strip of vellum cut to size and put through my Dymo embossing labeller. I also stuck on the punched out Daisies and I think it looks really lacy. 


Another idea for using your border punch is to make some decorative shelf edging.
I used some pages from my vintage encyclopaedias. I cut strips from a few pages and got rid of all the white edges. Then I joined the strips side by side with some double sided tape and got busy with my edger punch.These punches must be the easiest border punches I have ever used! Virtually effortless!
 I think it looks really effective, don't you? I love the vintage look!


And I have one more idea for using a border  punch and this idea comes from my 5 year old little girl. The punch used here is the stars border from Tonic Studios.


They're purrrrrrfect for making tiny crowns for itty bitty kittys!!!
...So like I said...not just for cardmakers!!!

Thursday, 20 January 2011

Thrifty cardmaking

Here is the anniversary card I made for my parents. I like to use what I have around the house, so I used one of my old encyclopedia pages as a background. I stamped it with a rubber stamp and gold ink, (the stamping doesn't show up that well in the photo.)

For the lovely little brass butterfly charms, I used a tomato paste tube and a paper punch. Yes, I did say tomato paste tube! If you want more details how I did this you can find out in this tutorial. The vintage couple dancing is from the graphics fairy.

For the flowers, I used my lovely new petal pairs punches from Tonic Studios. But I decided to be awkward and not just use them in pairs like your supposed to. For two of the flowers I punched two with one punch and one with another and fitted all three layers together. For the third flower, I used three different punches and punched out four flowers and although it was fiddly, I managed to fit four layers together and I really like the effect. You could make a whole lot of pretty flower embellishments with a few scraps of paper and these clever little punches. Quite economical really. I used a heart shape punch for the leaves and drew the veins with a pencil. The butterfly wings were cut from my butterfly punch.

..and because it's nice to share...here is one of my encyclopedia pages I scanned for you to use in collage or cardmaking. Such a fun image! I think I might use this on a card very soon.

Tuesday, 18 January 2011

A Quick Card Idea

Here's a quick suggestion if you are making a card for someone, and you want to enclose a little something extra in the envelope. I like to make a coordinating bookmark at the same time as the card, and pop it inside as a little keepsake.
I used my petal pairs punches on old tatty encyclopedia page for the flowers.
Graphics from the Graphics Fairy.