
A little Scottish saying for you this Hogmany (New Year's Eve)...
{Lang may yer lum reek!}
A salutation wishing long life and prosperity.
Literally, long may your chimney smoke.
Happy New Year everyone!

 Here's a very simple little project to make a last minute gift for a teacher or auntie. It's lovely for your child to be able to give something which they have made themselves. Fill it with a cellophane bag of choccies tied up with pretty ribbon, and Bob's your Uncle!
 You will need... a willing little helper. This is my sweet and creative 4 year old daughter .
 A heart and a flower paper punch...
 ...and a bunch of other stuff. I have here some Pebeo Porcelaine paint, a sheet of acetate for making a stencil (although you could just as easily use paper for this), an old sponge cut into little blocks for painting, some milk bottle lids for the paint, some masking tape and most importantly, a plain white mug for decorating. I find Tesco's basics range brilliant for this. A straight sided mug is easiest to work with.
 {Slight intermission where my daughter discovers building with the foam blocks is fun...I always save any foam from packaging...I think this foam might have come with a laptop computer. }
 To start with, I cut a strip of acetate the right size to go around the mug, then after a little help positioning the shapes, my little girl punched them out. OK this was posed, she did need to press with both hands to activate the punch, but she did manage to punch out the shapes all by herself. We alternated heart/ flower/ heart/ flower etc. Now we all know paper punches are wonderful for using with paper to make cards and other paper items, but did you know that using them to create a stencil can be very effective too.
 We fastened the punched strip to the mug with masking tape and then my little girl chose some paint. She mixed the colours herself using a cotton bud in the plastic lids.
 Using the little pieces of sponge, she dab, dab, dabbed. Then mixed a couple more colours and did the same. We then moved the stencil to the bottom of the mug and repeated the process. Simple!
  Look what I did mum!
  Of course you don't have to use hearts and flowers, if you have other punches that you would prefer, then go ahead - have fun! Let me know if you try this - I'd love to see the results.
 I wanted to share a little giveaway to thank you all for visiting my blog. Your comments always make my day, and I love to make new bloggy friends and visit your blogs too.
  What you will win is these hand rolled pure Scottish beeswax candles - two pairs of pillars. The aroma of these is so delicious! I made them this afternoon and the scent has pervaded the house! Mmm !
 You will also win this charming Alice necklace made from polymer clay. It comes on a silver plated chain in a handmade little gift box.
 You will also win this crazy brooch which is perfect for loose weave woolens. Use it to fasten a scarf or a cardi. It is a reminder for you to eat your five fruit and veg a day!
 It has a tiny little pea pod, a carrot, an aubergine/eggplant an orange and a tomato. It will certainly be a talking point. This also comes in a handmade little giftbox - one of my matchboxes.
I look forward to reading your posts and checking out where you are all from.
 ( I will choose a winner on the 24th December, so that gives plenty time for entering.)
 Here is our little house in the Highlands. As you can see, it is rather chilly right now.
 Current conditions are freezing fog. I am trying to keep my little girl cosy inside as she is cough, cough, coughing away at the moment.
 ...and now to warm your heart, a couple of pictures of my two silly girls. I don't really know how Naomi took these photos of herself and her sister, but they are cute aren't they?
 ...and I showed you these a long time ago, but here is another use for the plastic milk bottle lids I save. These are my pin cushion brooches. Very handy to have when you are sitting doing hand sewing and need somewhere to stick the pins and needles. Have you ever stuck a needle into the arm of your sofa only to forget about it until you prick yourself on it later? Hmm? No? OK! Anyway, they are very handy, and the plastic means that you don't stick yourself right through the brooch with a pin. I was going to list some in my Ebay shop eventually, but because I have been busy with the house at the moment, most crafts have taken a back seat. Although I have started to crochet a blanket in the evenings. I might show you later.
 ...I'll be back soon with a little giveaway... until then...stay warm and cosy :-)
 Hello from the snowy Highlands!
  (This was last night, just after it had started snowing. My little girl was so excited she went out without putting her coat on - there is much more snow today)
 We don't celebrate thanksgiving in the UK, so I am sharing a very Scottish Highland and totally un-thanksgivingy image and sending greetings to all my American bloggy friends. I pray you have a very lovely time with your families counting all the blessings you have.
  In 2000 we moved to Belize in Central America for 2 years. The best part of it for me was all the wonderful people I met while there. My husband worked as the Principal of a small Christian school and through that we came in to contact with some amazing people. I have many fond memories. However, life there was not as comfortable as we have grown used to in the UK. We frequently were without water, did not have AC, had no hot water for washing dishes, and the only hot water tap was in the bathroom- not attached to a shower, so we used to fill a bucket with warm water and then wash ourselves with the aid of a plastic jug. It would have cost too much to fill a bath, but I do have some hilarious pictures somewhere of my daughter having a bath squashed into a blue plastic tub - I wouldn't dare embarass her by sharing those!
 When we moved back to this country, I said I was going to paint a lizard or a gekko somewhere on the wall of each room in our house to remind us to be thankful for all the blessings we have in this country that I used to take for granted.
 So...the next house we get...Lord willing...lots of gekkos!
 I made the desk pad yesterday- (not that I haven't got another million jobs I should have been doing,) but it was very satisfying all the same!
  It is a Laura Ashley fabric scrap I was given by my sister in-law who is a wonderful interior designer. How I love her scraps!
 I cut it allowing around an inch and a half overlap all the way around.
 I watered down some pva glue - just a little bit, then spread it evenly over the front of my board and smoothed down my freshly ironed fabric over it.
 Then I flipped the board over and stuck down the edges with the help of some masking tape to hold the fabric in place while the glue dried. I have made one of these before using iron on bondaweb. It was much less messy and far speedier, so if you are wanting an instant fix, then go ahead and use bondaweb.
 Once the glue was dry, I used some scraps of vintage leather to make some nice neat corners on the my desk pad. The size I used for the leather strips was 1 1/2" by 4". I made a paper template first to get the right size. I used my hot glue gun for a strong stick and only glued the leather onto the back of the board, leaving the triangles open on the front for tucking in paper or little notes.
 The scraps of vintage leather came from a chair that was fairly broken up but I didn't want to waste the leather. I had bought two of these chairs - yes two, for £1 a few years ago at my local auction. Here is the other chair which was fine but didn't have a seat cushion. I had a bit of foam so I cut it to size and made a cover for it. It's my favourite chair.
 To neaten up the back of the desk pad I used a bit of lurid green felt I had leftover from a puppet project. But you could use whatever you like. If you use bondaweb, then you could use ordinary fabric because the bondaweb will prevent any frayed edges. If you are using glue, then be patient and let it dry properly before turning your pad over otherwise it will stick to your desk -not that this has ever happened to me ;-)
 These deskpads are very handy for protecting a desktop or table, and perfect for when you are using your sewing machine and don't want to mark your furniture. They look pretty smart too.
 I wonder if you'll make one...
 I finally finished painting my husband's desk! This desk has been with us since we were first married around 21 years ago. It was our first trash rescue as a couple. It was being thrown out and was across the street on the kerbside looking sad and lonely. We waited until it was dark, and tiptoed with it it across the road to our first apartment.
  I have a bit of a thing for these kind of drawer pulls, plus I love how they echo the shape of the shell on the middle drawer
 I bought them about 11 years ago. I think if I could do it again, I would have bought silver handles, but otherwise, I am very pleased. Now the hard part. Getting the desktop to remain tidy
 Hi! I know it's been a while.
  I still have much to do with the house and have been busy painting and decorating this last wee while. I don't have a great deal to show you at the moment, as I have been doing a bit here and a bit there, but hopefully some images will come soon.
 Well, I've finished the long hall ceiling and am currently working on painting the wood trim. I have finished painting Naomi's room and am now waiting for a carpet fitter who is coming next week. I have started painting the wood trim in the back hallway. I have nearly finished painting my husband's desk- one top coat to go . I finished doing some touch up painting in my son's room. I fitted some wood trim in the bathroom. Have had a few clearouts and got rid of some junk. I have made two batches of jam. (Strange jam I might add!) Kiwi, apple and ginger jam, and mango, apple and redcurrant jam. Both look a bit like science experiments, but they taste really yum. I have managed to accumulate a huge pile for ironing, and failed completely when it comes to keeping the place dust and cobweb free!
 Our house-martins now have a little window on the world. My husband took this photo earlier this evening! Aren't they adorable. This is their second brood of the season.
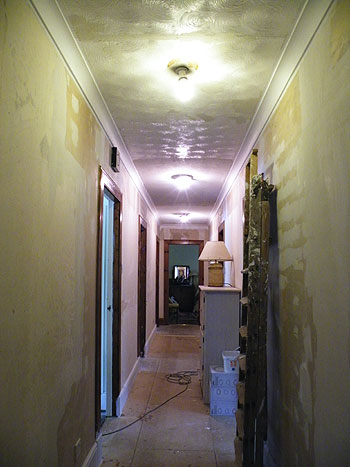 We moved into this house about 7 years ago and in our immediate enthusiasm began ripping out the awful wallpaper and carpets and starting to fix things up, then there were a few hiccups along the way ...I had a baby, and then we built a log cabin in the garden for my parents to sleep in when they visited among other things... and many of the jobs that were started have been waiting a long, long time to be finished. In some rooms we have had no carpet for a number of years, and we have just kind of gotten used to it. Now we are planning, Lord willing, to put the house on the market and move to something easier to maintain, therefore, I have to get those decorating jobs done now. My list is long, but I am slowly plodding through it. My current task is to get the hall ceiling fixed up.
  ...then there is the mid stage... I apply a grey gloop to cover over the swirls, but this does not leave a perfectly smooth finish like plaster. Also it is a very slow process as I apply it with a credit card, because the applicator that you are supposed to use ends up with me being covered in more grey gloop than the ceiling. I have used this stuff before for my kitchen ceiling about 5 years ago, and forgot just how much I hated the job. It's the kind of job that brings me to tears! OK, so it actually did make me cry - pathetic I know!
 Then this is the almost finished stage, I have now applied a sort of gritty textured finish to cover over the grey gloop. I need to give it a coat of white emulsion paint now to hide the grey properly.
 So I have three separate stages going on right now, and I am just over halfway with the grey gloop. I only have a couple of hours in the mornings to do my decorating while my little girl is at nursery, so that is why progress is slow. Thankyou if you have read this far! I shall keep you posted on the progress of my long haul with the hall. Have a wonderful day!